Sunday, January 10

Trapped Woman

Trapped Woman


1. This tutorial will show you how to easily make it look like someone is crawling out of someone else’s mouth.

This is a very simple tutorial, making it very easy to do. You could use this effect to make it look like someone is trapped in a cave, or maybe a container of some sort.
We start with the man that is yelling/screaming.


2. Select all of the area inside of his mouth that would be located past the teeth.
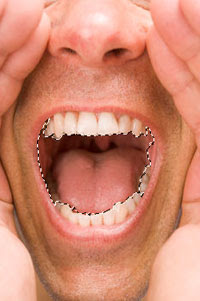


3. Copy and paste this onto a new layer. We’re saving this for use in a minute.
On separate layers, copy and paste a woman’s head, and two hands.


4. Erase/delete all of the white space around these pieces.


5. Position the hands by rotating them with the transform tool CTRL+T, then erase any small bits of the hands that overlap the teeth. We want it to look like she is actually holding onto the teeth.


6. Copy the woman’s head and hide the layer.
Hold down CTRL and click on the layer we made with the inside of the mouth. This will make a selection around that piece.
Edit >Paste Into to paste the woman’s head inside of that shape.


7. Then position the woman’s head.


8. Add a new layer behind the hands, but above the face layer.
- Hold CTRL down and click on that mouth layer again to make that selection again.
Be sure your new layer you just made is active.
- Use the eyedropper and select a darker color from the mouth/woman, we’re going to make some small shadows for some depth.
- Use the Brush tool with a Soft Round brush smaller in size and paint around the edges of the hands where there would be shadows.


9. Now create another layer that will be behind the head.
- Use that same mouth selection and choose something close to black for the color.
[ Do the same, behind the head as you just did for the hands. ]


10. Now use the Eraser with a Soft Round brush at about 20% opacity and go to both of those layers, lightly erasing some of the shadow that looks like too much. Click several times in one area to erase more


11. Add a couple shadows here and there to your hands. Use the Lasso tool with a 5px feather, then adjust the Hue/Saturation. Drag the Lightness down a little to make it more shadowed.


12. Using the Burn tool again with a Soft Round brush, Range: Midtones, Exposure: 7%. Go over the picture a couple times to not only make the areas darker, but the colors a little more intense.


And lastly, select the layer with the guy’s face in it and adjust the levels a little to match the woman in his mouth.
Done!


Basic Brush function in Photoshop


Basic Brush function in Photoshop


Brush property can be use for any other tool that requires painting on the effects or selection such as painting dodge and burn effects or painting quick mask selection.


Selecting Brush – Photoshop is shipped with many predefined brushes, you can find them under the brush selection menu. Select the set you want and you will be asked to Replace or Append. Replace will hide the current brushes and replace it with the new set. Append will add the brush on to your current selection.


Under this menu you can also select different viewing mode, try them out and see what fits your taste best.


Select Brush by clicking on the brush icon on your tool box or use the shortcut B

You can use paint in different blending mode but I recommend doing it on a blank layer and using the layer blending mode so that you will get a chance to change it later.


Opacity can be changed by typing in a number, sliding the slider or pressing the number keys.
A lower number will make your paint transparent. The example below shows 100% opacity than 50 and 25 percent.


Flow is how fast and how transparent the paint is released as you drag your mouse across.

- You will see a very obvious spacing if you are using a brush with hard edge, a small Flow percentage works best with a soft edge brush. It gives a more realistic paint brush effect than using the Opacity setting.

-The example shows 30% flow using soft edge and hard edge brush.


- Airbrush will only be visible on soft edged brushes. It simulates airbrush painting, as you hold your mouse in the same location the paint will build up into a bigger blob.

- The example below shows two different location where I stopped my brush and the paints builds up into thicker paint.


- You can also set physical dynamics on your brush to simulate real world brush or creating custom randomized effects.

- Play with the settings under Brush Dynamics with the shortcut F5 or pressing the Dynamic icon.


Good luck ! 

Link : http://www.sanweng.com/basic-brush-function-in-photoshop/