Create a Simple Typography Design
In this quick tutorial I will show you the basic technique of creating a typography design by using words in the shape of a letter.
First start a new document and make the canvas a large size,
mine is 705 X 728 px.
Make the background black and place a letter P in your canvas with the text tool. I used a font called Helvetica Neue 77 Bold with the size of 800px. You can use whatever font you like.
Once you put your letter in the document create a new layer above it with the keyboard shortcut
shift + ctrl + n or for mac users cmd + shift + n.
Choose the new layer and hold down ctrl or cmd and click on the preview icon beside your letter layer to create a selection around it.
Hide your letter layer so you just have the outline showing on the canvas and then click on the “Paths” tab in your palette.
If you do not see that go to Window ---> paths.
Click the little arrow in paths and choose, “Make Work Path…”
When the window pops up put the tolerance on 1.0
Once you get the path made click back to your “Layers” tab and choose your type tool.
Using the type tool put your mouse over any part of the path and your cursor will change a bit to show you that the text will be going around the path.
After you click on it, type text all around the letter to create an outline. I went through and made some of the fonts bigger, smaller, bold, and unbold.
Now you can go back to the “Paths” tab, right click on the path and choose delete.
You should have a good text outline around your letter now.
From there I am going to start adding text within the letter. So I will use my type tool yet again and just randomly place text within it.
You can either put different text in random spots or go horizontally or vertically across the letter filling it up. I like the random effect personally so I will place the text within the letter randomly.
You can duplicate other layers and move them to other places in the text.
It is hard to come up with enough different words to fill it up.
And continuing on filling it with text…
Place some larger bold fonts in there to add a neat looking effect by mixing the letters up.
And after getting all the text filling up my letter here is what I have
- I put all my text layers in a group by clicking the arrow beside the palette and choosing
“New Group from Layers”.
- Once I did that, I duplicated the group and hid one of them.
On the one I left visible I merged it down so it is just one image.
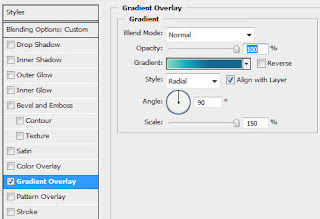
- Now its time to add a gradient to the text to make it stand out more.
- So right click on the layer and go to “blending options”.
- Go to your gradient and use these settings:
- That is pretty much it, I am going to add a cool background to go behind the text and call it a day!
- For the background part I am going to use my gradient tool set to radial gradient.
- Make sure you have chosen foreground to transparent. After you click on your gradient tool and choose the color, go to the top of your photoshop screen and click on the gradient preview:
Choose basic colors, like yellow, blue, green, and red and in a new layer drag your tool
in different places to create round blurry dots.
After that create a new layer above that, fill it with the color black, and then go to
filter ---> render ---> fibers to fill the canvas and set it color dodge.
Now I will unhide my letter and it does not blend in great on that background
so I will use a large soft brush to put a shadow behind it and that’s it for this one!
Link : Here


