Monday, January 9

Changing a Car’s Color in Photoshop

Posted on by Roofi Sardar on June 17th, 2011 | 
SOURCE HERE 

Final Result:


1)  Load the image you would like to work on in Photoshop.
For this tutorial, I am making use of the image below:


2)  We are going to add a Hue/Saturation adjustment layer onto this image.
 To do this, in the Layers Panel, look for this icon: 
3)  Left-click the icon and select Hue/Saturation
This opens the Hue/Saturation panel for the adjustment layer.

4)  In the Adjustments panel, make the following changes:


And this is just about it. The color changes from Red/Orange to Green. 

One important thing to note here is that this function works so well for the image I have used because the color Red is only present in the car’s body and not elsewhere in the picture. 

Otherwise, every part of the image that was Red would change to Green, and frankly, you could end up with a very nasty image.

Final Result:


Create Glowing Text Effect

This tutorial will brief you with the ease of creating a simple glowing text effect using only Blending options.
Posted on by Roofi Sardar on October 13th, 2011


1) Create a new layer with Width 600, Height 340.

2) Fill this layer with black color.


3)   Now create your text using the white color. 
The font is ‘Concielian 3D.’
To get this font, use the link below:

Resource:  http://www.fonts2u.com


4) Double click on the text layer.
Make the following changes:


5) Right click on the Text layer and choose Create Work Path.
  

6) Now set the brush settings as follows:


7) Create a new layer on top of the text layer.

8 )  Click the Path Panel.


9) Now right click on Work Path and choose Stroke Path.


10) Ensure that the Simulate Pressure box is checked.


11) Right click on Work Path and choose Delete Path


12)  Hold down the ALT key and drag the fx symbol from text layer onto the new layer.
This copies the text layer’s effects onto the new layer.

13) You should now add Drop shadow to the new layer, making the settings as shown:


That should do it.

Tuesday, January 3

Using HDR Toning in Photoshop to Create a Fantasy Forest Scene


Photo Effect, Photoshop Tutorial by Natham Brown


In this tutorial I’m going to show you my process for utilizing the HDR Toning feature of Photoshop CS5 in combination with a few lighting effects to create a fantasy forest scene.


Step 1

First off we need to find a good forest image to use as the base.

After some searching I came across this image of a foggy forest with a tiny bit of light coming through the trees. That’s perfect that we can see the direction the light is coming from. It will help when placing the lighting effects later in the tutorial.

Open the forest image in Photoshop and load the HDR Toning dialog (Image | Adjust | HDR Toning).
Below is the image after applying the following settings.


This warmer tone, applied by the HDR Toning,
will be the color treatment will us for the rest of the comp.

Step 2

Now lets apply some lighting as it peaks through the branches of the trees.

I used a few brushes from the Ultimate Lighting Effects  brush set here at WeGraphics.
 I chose a light yellow and applied the brushes to a new layer with a blending mode set to Overlay.


Step 3

To enhance the lighting a bit more we need to light the ground a bit. To do this use a large round soft white brush and apply the brush to the ground with a single click.


Now transform (Cmd+T) the soft white circle and flatten it vertically.


Now set the layer’s blend mode to Overlay, and repeat the step a few more times until the forest floor is well lit.

Step 4

Now lets add some rays of sunlight breaking through the leaves of the trees. To do this choose a small soft white brush, and while holding the shift key on your keyboard draw a straight line across the document on a new layer.


Now transform (Cmd+T) and rotate the line so that it appears diagonal from the top left corner.


Now set the layers blending mode to Overlay and reduce the opacity to 50%.

Then repeat the step with several more lines. You may want to reduce the line weight for some and also use a soft eraser on portions so that it looks like some of the rays are going behind the tree trunks.


Step 5

Now I want to add a few lens flares at the top where the light is coming through the trees. I want these to be subtle and further enhance the lighting. I used the Bokeh Effect Brush Set here at WeGraphics to achieve the effect.


Step 6

For the final step I want to add 3 adjustment layers to help blend the effects. First up, lets add Black and White adjustment layer to reduce some of the saturation on the forest floor.

Use a large soft brush to color the center portion of the layers mask to reveal the colors below the adjustment layer.


Now lets add a Gradient Fill adjustment layer to darken the edges.
Use the following settings.


Now apply a gradient overlay layer style to the adjustment layer with the following settings.


For the last adjustment layer add a solid blue color fill (#2a3d83) and set the blend mode to Overlay and opacity to 50%.

I added these to cool some of the warm tones in the image.


Create a Chaotic Disintegration Effect on a Face

Photoshop Tutorial:  Effect

■■ Source here ■■


This tutorial will show you a quick and easy way in creating a stunning disintegration effect in photoshop.
I created this work on Photoshop CS5 but earlier versions will work as well.

The sources:
1.   The face

2.   Shatter glass brushes
3.   Bird brushes
4.   The branch 

 Let's just get started!

Step 1

First of all, go to file and then hit new to create a new canvas (Ctrl+N) .
This new canvas will be the background layer in the layers palette


Step 2

- Now duplicate the background layer (Ctrl+J).
- With the duplication layer (background copy) selected, go to Filter > Render > Lightning effect
- See the picture for the details of lightning effect setting.


Step 3

Next , set the blending of the background copy layer to normal at 58% opacity after that duplicate it (Ctrl+J).

Now we have background copy 2 layer

Set the blending of the background copy 2 layer to color dodge at 100% opacity.


 Step 4

Continue to create a new layer (Shift+Ctrl+N) and name the new layer shape 1

Then, go to Brush tool (B) in tools palette.

Choose shatter glass brush and paint a shape like mine. ( See the picture below ).


 Step 5

Arrange the position of the shape 1 as shown in picture below:


Step 6

Next step is to duplicate the shape 1 layer three times and then place the three duplicated layers below it in the layers palette.

Rearrange the position of each where needed. Set the shape1 copy layer to normal blending at 100% opacity, while the shape 1 copy 2 and the shape 1 copy 3 layer are set to multiply blending at 78% opacity.

See the image below..


Step 7

Now open the face image.

We will cut out the face. To achieve this, select Pen tool (P) in tool palette.

Continue to trace the face by clicking new anchor points as you go, these show as small squares on your screen. Proceed with tracing the face and work your way to meet the first anchor and close the path. After that, right click on the closed path.

When the pop up window for the path execution comes up, choose make selection. Finally inverse the selection (Shift+Ctrl+I) and hit Del to clear the background.


Step 8

Add the face to the canvas. It will be a new layer and name it Face in layers palette.

Step 9

Now it’s time to crate the disintegration effect to the face.

We will use Clipping Mask to achieve this.

To create a Clipping Mask, first make sure the shape 1 layer is directly under the face layer that we want to be clipped in the Layers palette .

Hold down Alt and click the line between the two layers in the Layers palette.

The cursor changes to a symbol. Click the mouse. You will see a small arrow pointing downward next to the face layer. This small arrow is the indication of a layer clipped mask.


Step 10

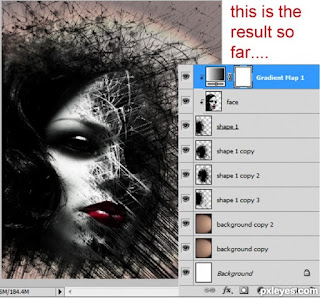
In this step we will add Gradient map. Go to Layer > new adjustment layer > gradient map

Step 11

Now set the blending of the gradient map layer to overlay at 90 % opacity.


Step 12

I wanted to give some light to the eye of the face.

To create the light, create a new layer (Shift+Ctrl+N) and name the new layer Light.

Now select rectangular marquee tool to make a selection around the eye. Fill the selection (Shift+F5) with black color.

Then, go to Filter > render > lens flare. Finally set the blending of the light layer to color dodge at 100% opacity.

Remember to mask some area round the face to hide unnecessary light. Try to make the light just focus on the eye.


Step 13

To give more dramatic effect, I added the branch image. I duplicated it into some layers and arranged the duplicated layers in the positions where needed. 

Remember to re-size them and set the blending to multiply at around 50-100% opacity.

Step 14

In this last step, I added photo filter (Layer > new adjustment layer > Photo filter).

Set the photo filter layer to normal at 30% opacity.

Step 15

here is the result. Thank you for visiting this tutorial. Happy photoshoping...