

Design a grunge styled portrait in Photoshop
Step 1
Open the photo of the lady in Photoshop and go to Image>Image size.Switch the width value to 2000px and make sure that “constrain proportions” is checked. We have resized the image because too large and it could be more difficult to find a texture of the same size.

Step 2
With the Lasso tool select the head of the lady and add a layer mask (click on the “add layer mask button” at the bottom of the layer’s window). Layer mask is the best way to isolate an object without lose pixels. This is not a simple argument for Photoshop beginners, and I suggest you to read some articles about this topic that is fundamental if you want to seriously work with Photoshop.
Step 3
Select the lady’s layer (not the mask) and go to Image>Adjustments>Threshold. Put 90 as threshold value. Now you can use the erase tool to eliminate unwanted pixels, or (the better method) select the mask and remove unwanted pixels with a black brush.(When you use layer mask, black eliminate while white restore the image).

Step 4
The aim of this step is to isolate black parts of the image. So make sure to have black as foreground color and go to select>Color range. Set fuzziness to 200 and hit OK.
Step 5
In the Paths window click on the right arrow and select Make Work Path with tolerance 1,0. Now in the layer window create a new layer, grab the pen tool and right click on the canvas>Fill Path. Call this layer “lady black” and hide the other lady’s layer.White has disappeared. You can also delete the path.

Step 6
Create a new layer and with a black brush start painting over the white parts in the hair of the lady.Also create a new layer, fill it with white and place it below the “lady black” layer.

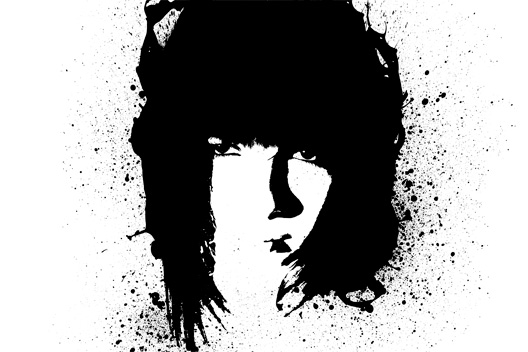
Step 7
Create a new layer and use splatter brushes to paint around the hair of the lady.This is my result:
Step 8
Paste in the texture. At this point we have to play again with selections and layer mask: with the texture layer selected, ctrl+click on the “lady black” layer to select its pixels. Then shift+ctrl+click on the layers where you’ve painted on with the brushes to select also their pixels. You should obtain something like this:
Step 9
Add a layer mask to the texture layer. Now you can hide all the other layers except the white background.
Step 10
Now we can add a gradient adjustment layer (click on the “create new adjustment layer” at the bottom of the layer window and select “gradient”).You can choose one of the default gradients or create a new one with the colors you prefer.
Set the gradient layer to overlay.

Finished!
NANGKENE RUSAK `E


