Monday, January 10

Money Style Illustration in Photoshop

Money Style Illustration in Photoshop

[http://abduzeedo.com/money-style-illustration-photoshop]

Thanks for the author for making such a amazing tutorial like this. It`s awesome, so I put here in my blog and share with you all. Hope you like it.

There might be different ways so if you know another one share with us, this was the one I came up with and it's very easy.

Step 1

Open Photoshop and use a photo that you have or want to apply the effect, in this case I will use of myself, the one I use on Twitter.

Step 2

Go to Image>Adjustmenst>Desaturate.


Step 3

Go to Image>Adjustments>Levels.
Change the black input to 50 and the white to 150, also, change the grey input to1.


Step 4

Go to Filter>Blur>Surface Blur. Use 30 pixels for the Radius and 20 for the Threshold.
- Save this PSD file as Displace.psd.
- We will use 2 files for this tutorial, one will be the displace and the other the real design.
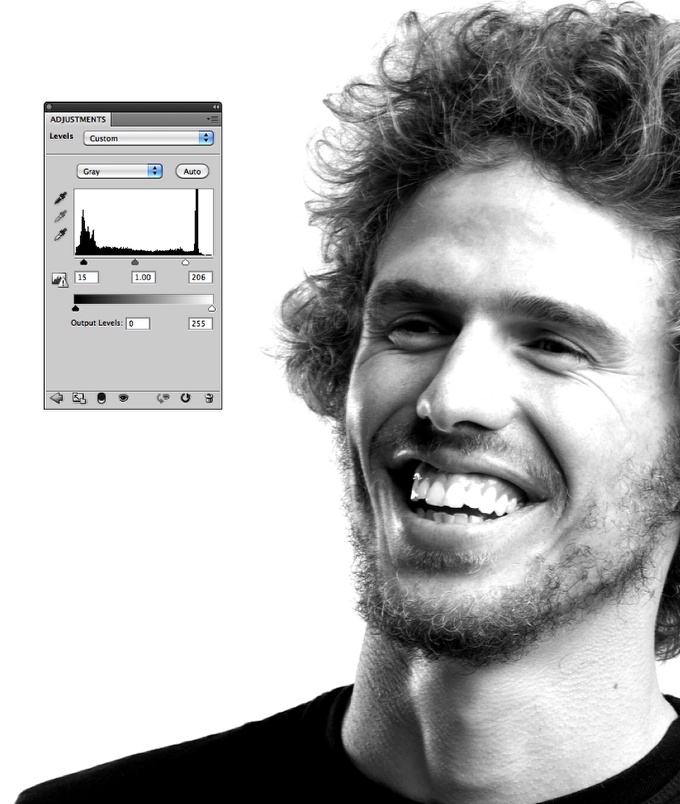


Step 5

Undo some of the steps until you get the greyscale image. Save it as me.psd.
- Then go to Image>Adjustments>Levels. Use 15 for the black input, 1 for the grey and 205 for the white


Step 6

Go to Image>Mode>Greyscale, then go to Image>Mode>Bitmap.
- Use the default settings, my output is 240 pixels/inch because my input is the same, so that value will vary depending on the input you have. Also for the Method use Halftone Screen...


Step 7

The next dialog box will be the Halftone Screen settings.
- Use Line for the Shape and 30 lines/inch for the frequency. Also, change the Angle to 0. Tip: Depending on the resolution of your image the frequency might change, so you will have to try some values until you get the best result.


Step 8

This is the result you will have after you change your document to Bitmap mode.
Now let's change it back to Greyscale. Go to Image>Adjustments>Greyscale.


Step 9

Go to Filter>Blur>Gaussian Blur. Use 0.5 pixels for the Radius.
You can use 1 as well. All these values will vary depending on the resolution of the image you are using.

Step 10

Go again to Image>Adjustments>Levels. Change the white input to 110.


Step 11

Go to Filter>Distort>Displace. Use 1 for the Horizontal Scale, 3 for the Vertical and then Stretch to Fit and Wrap Around for the other options. Press OK.
- Another dialog box will open to select the Displace map. Select the Displace.psd file we created in the step 4.


Step 12

Now the displace filter will distort the image so the lines won't be uniform and horizontal


 Conclusion


Now you can add your logo and play around with other effects. The displace filter is one of the coolest filters in Photoshop because we can create tons of different effects with it, like this tutorial.

 Detail
You can play a little bit more increasing the level and also the gaussian blur.


Another Example

Here you can see another version using a paper texture and then with Hue and Saturation I gave this green tone to the design. Also use color burn for the blend mode for the image layer that will be on top of the texture.


Detail 2


LINK : HERE 


Thursday, December 16

Making of the HD Color Lines Wallpaper

Making of the HD Color Lines Wallpaper

In this tutorial I am gonna show you how to make a colorfull wallpaper. I will explain how i made V2 – Radial of the wallpapers i uploaded shortly before this post. It’s not a difficult tutorial. This will be the outcome:


Step 1; Set this thing up
Let’s start off with setting up our document. Create a new document. I used the sizes for a HD wallpaper so that’s 2560 pixels (width) by 1440 pixels (height). Resolution stays 72 dpi and color mode RBG Color and 8 bit. Of course you can change this settings for you own unique sizes and sh*t. However, it’s recommended that you change the background contents to Background Color.


Click OK and you’ll get something black.

Step 2; A bunch of lines

Ok, now that we have our background, lets start with the lines. Now we go on with the radial lines. This is very easy but takes a bit of your time, the way I do it. I haven’t checked if there is a less time-absorbing way, but if you got one please comment!

- Get your line tool, change the weight to 2 pixels and create a white line from the bottom to the top.
You should see a line. To change the position just press V (Move Tool), then Ctrl+A (Select All) and then you should notice that in the bar where you can change the settings for your current tool (I’ll call it the Options bar from now on) the buttons on the right have become clickable.
- Click the second one to align the line to the bottom of your document and the 5th button to align it to the horizontal centers.

Here comes the duplicating part. 

- Press Ctrl_J (Duplicate Layer) 7 times. Now you should have 8 layers with 1 line. 

-click on the second layer containing a line ant press Ctrl+T (Free Transform). At the Options bar you set the reference point location to bottom center and the rotation to 2,5 (or 2.5 depending on you preferences). 

-Apply the transformation. Now go on to the next line-layer and do the same as just before, but now add 2,5. So instead of 2,5 you rotate it with a value of 5,0. Do this again for the 3rd, 4th and 5th layer. 

- Now merge those 5 layers and duplicate them 4 times. Just as before you press Ctrl+T on the second layer containing a line but be sure you change the reference point location to left bottom instead of center bottom.


 Rotate it with a value of 12,5 and apply the transformation. Do this again with the 3rd layer, 4th, 5th, 6th, 7th and 8th layer by constantly adding a value of 12,5 at the rotate part. Now merge them line layers and duplicate the result layer of the lines


Press Ctrl+T and set the reference point location to left bottom, the width to -100%. 
It CAN turn out ugly at the center line; be sure to let the center line be 1 center line, not 2. So if you have to just press V (Move Tool) and push the new layer a bit to the probably right to make it look like just one line. Merge the 2 layers containing lines and now you should have something like the last image.


Step 3; Go brushing

Create a new layer, get a soft 2000 pixel (based on the 2560×1440 document size) brush and click 1 time at the center bottom.


Put the layer underneath the lines layer. Now you change the lines layer blending mode to overlay. This is to make the lines look fading away at the tops.


Now create a new layer and get a soft 1000 pixel (based on the 2560×1440 document size) brush and make a line from the previous brush down at the center bottom to the top.


- Duplicate the layer 4 times.
- Transform the first duplicated layer by pressing Ctrl+T.
- Set the reference point location to center bottom and the rotate to 45.
- Do it again for the other layer but use there the rotate values 90, -45 and -90.

You’ll think this sucks but it is just to help us with the gradient maps in the following step. TIP: it’s handy when you put the 5 layers in order of left to right for the following step.


Step 4; Adding them colors


 It’s time for the colors.
- First click the eyes of the 5 layers you just created with the 1000 pixel brushes to make them dissapear.
- Insert a gradient map.
- Take the black to white gradient and add a color (in the gradient) at 50%.
- Change the middle color to red (#FF0000).


As you can see on the image above, it’s not correct that some parts arent red. I know, just don’t bother about that ‘couse I will show you how i did it. Ctrl+Click on the first brushed layer from the 5.
- Press Ctrl+Shift+I (Inverse Selection) and delete that on the red gradient mask.


- Do this 4 more times for the other brushed soft “lines”.
-Use altern colors. I used the following: 1st #FF0000 2nd #FFFF00 3rd #00FF00 4th #00FFFF and 5th #FF00FF.


Final Results

 LINK HERE :