Saturday, May 29

Using the extract tool

Using the extract tool

The extract tool is a very useful function in Photoshop as it allows you to cleanly select photo's and cut them from backgrounds to paste your image or drawing into another document, or just to get rid of the background. Lets take a look. 


I used this photo


http://www.freedigitalphotos.net/images/view_photog.php?photogid=256

However, try your own photo and see how this works out for you 

Now, open up your image in photoshop. 

Go to Filter > Extract

It will bring up a box like this once you have selected extract.
At the side panel on the left hand side there are icons in which you need to select in order to use the extract tool.


If you hover over the top one eventually it will say 'Edge highlighter'. Select this tool.

*Hover over the other icons and find out what they are. The two tools we are using to day are the:
- Edge Highlighter (B)
- Fill tool. (G)

I will also be using the Hand (H) and Zoom tool (Z)

Now, to start to extract your photo from the background I find it is easiest to Zoom in on the image this way you are able to get the closest possible selection which makes the out come a lot nicer. 

Before we go on I want to bring to your attention a handy little setting on here called the 'Smart Highlighting' tool. You can find it on the right hand side tool pane. 

This tools help you accurately select your image around the outline of what you want to select. When you have this selected you get more accurate results so I recommend you use this, If not, then use the normal edge highlighter 

Carefully start to trace around the edge of what you want to keep. 
 
 
When you have gone around fully what you want to keep, select the 'Fill tool' (G) and then fill in the area you want to keep. 

*Common Problem
 
When this happens, it means you have not joined up your edges properly. When this happens go back and search for a gap in your outline. When this has been fixed, try again. 
 
 
Click ok, then you should have the image you want to keep on your canvas. 


Thanks for taking your time to view this and I hoped it helped to understand the extract tool more as I know at first I didn't exactly know what the exact tool was about until I actually fiddled with it a bit!


Wednesday, May 26

Super Easy Typographic Portrait in Photoshop

"Super Easy TypographicPortrait in Photoshop"

In this tutorial I will show you how to create a really cool and super easy typographic portrait in Photoshop. We will use the Displace filter and some Blend Modes to achieve the effect. The whole process is quite simple but it might take you some time to add the texts and elements, but once you do that the rest is very straight forward. 


 Step 1

Open Photoshop and create a new document. I used 2560x1440 pixels for the size. Then import a photo of yours, I'm using a portrait taken by a John Arlington, a great photographer friend of mine. The photo I have is with white background, so extract the background.


 Step 2

Duplicate the layer and go to Image>Adjustment>Desaturate. You will have a black and white photo. Add a white background. After that save the file, it has to be PSD otherwise it won't work with the Displace filter.


 Step 3

With the Horizontal Type Tool (T) create text boxes and start adding texts. The idea is to play with the texts, they don't have to be readable, or at least with normal legibility, so play with the line-heights, reduce that so the lines overlay one another.
Also make some keywords much bigger and bold, like in my case I highlight some words like Photoshop Tutorials, Illustrator, Inspiration... Also, play with italic, regular texts as well as alignments and text sizes.  

Tip: I used Garamond for the font, I think serif fonts look much better for this effect.


Step 4


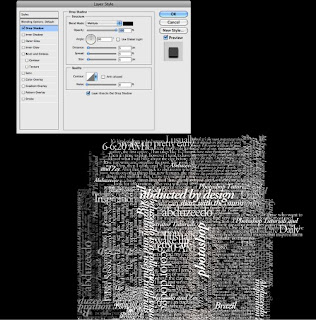
For each layer, go to Layer>Layer Style>Drop Shadow. Use Multiply for the Blend Mode, black for the color, 90º for the Angle and 5 pixels for Distance, Spread and Size.
Also, group all the layers and the duplicate the group. Go to Layer>Merge Group and then go to Filter>Blur>Gaussian Blur. Use 10 pixels for the Radius. This blurry layer will have to stay behind the regular one. The idea is to add some depth to your text, that's why the shadow.
You can duplicate the orginal text again and move it a little bit to the top and left as well to add even more depth.


Step 5


Select all the text layers and merge them into one layer only, then go to Filter>Distort>Displace
A dialog box will appear asking you to choose a file. Select the PSD file we created on the Step 2. After that for the Displace settings use 15 for the Horizontal and Vertical Scale; use Tile for Displacement Map and Repeat Edge Pixels for the Undefined Areas.
The displacement map will distort the layer based on the greyscale photo we used, the dark tones go down while the lights go up.


Step 6


Put the photo layer on top of the white text layer, then change the Blend Mode of the photo layer to Light Burn.


Step 7


The photo has too many details, so go to Filter>Noise>Dust & Scratches. Use 7 pixels for the Radius and 0 levels for the Threshold.


Step 8


Mask the text layer so you will have just the texts over the photo.


 Conclusion
You can reduce a little bit the saturation and as I mentioned before, you can add more text layers and even try different symbols and shapes.
There are many ways to create this effect, this perhaps is the easiest one, but you have to be very careful to make everything very subtle, otherwise the effect won't look as cool as we expect.