3D text effect - 2009
- Create a new file (File -- > New) of 1280x1024 px and 72 dpi.
- Choose then the Rectangle Tool (U) to stretch out the rectangle on the whole working zone.
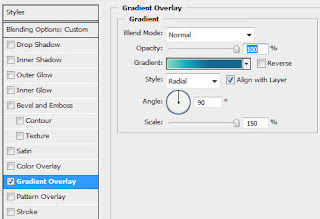
- Set then Blending Options>Gradient Overlay (on the same layer on the layers panel).
- Follow the next indications:
Select the Custom Shape Tool (U) and choose the next demonstrated element:
Put it the same way demonstrated below:
Set the same opacity level shown below:
Set the next Blending Options:
you should get the next result:
Using the Ellipse Tool (U) and the Rounded Rectangle Tool (U) with a radius of 10 px,
we can represent a cloud out of several circles, representing also the effect of painting stain.
we can represent a cloud out of several circles, representing also the effect of painting stain.
Select the for each element:
Make copies for all the layers. Mark out the copied layers (Ctrl+left click)
and put them together (Ctrl+E). Put the new layer under the original one,
applying on it the next indicated Blending Options:
and put them together (Ctrl+E). Put the new layer under the original one,
applying on it the next indicated Blending Options:
You`ll get the next picture on this stage:
open up the Adobe Illustrator to represent the year of 2009 in 3D.
Select the same text�s demands as on the next picture it is represented. Choose also the color #FC0101.
Select the same text�s demands as on the next picture it is represented. Choose also the color #FC0101.
Then write the first cipher 2, applying the settings of
Effect --> 3D --> Extrude -->Bevel
Effect --> 3D --> Extrude -->Bevel
Write now the 0 cipher, following the next demands:
The second 0 cipher
and finally 9.
Place the ciphers we`ve got the same way indicated below,
mark them out and move them in Photoshop.
mark them out and move them in Photoshop.
Place them above the layers:
Using the Rectangle Tool (U), insert a kind of element, demonstrated next picture:
Set the next demonstrated parameters:
- Make a right click on this layer on the layers` panel and choose the option Rasterize Layer.
- Applying the Eraser Tool (E), try to erase the unnecessary elements, getting the picture from below:
Do the same operations, following the next demands:
We got some stylish ciphers:
Create a new layer and use on it the Rectangular Marquee Tool (M)
for the necessary markings and then apply the Paint Bucket Tool (G)
to give the markings the appropriate color.
for the necessary markings and then apply the Paint Bucket Tool (G)
to give the markings the appropriate color.
- Insert several lines on the picture, having the color #FFCF8A
The unnecessary things will be erased with the Eraser Tool (E).
For the next cipher we`ll use the next demonstrated element.
In this case we`ll represent an arbitrary pattern replacing with
white figures as on the next image it is shown.
In this case we`ll represent an arbitrary pattern replacing with
white figures as on the next image it is shown.
- Then put together the layers and rasterize the new layer we`ve got.
- Fill 30% for the last made layer and erase those things we don`t need on the picture:
Next we`ll insert several circles and lines on the rest of the ciphers:
The wallpapers are done!
The wallpapers are done!


No comments:
Post a Comment