
Trippy ColorsPhoto Effect Tutorial

Info & Save:
Source
Source
Category : Photoshop
Date added : 09-08-07
Level : Beginner/Intermediate
Author : Celox
Intro:
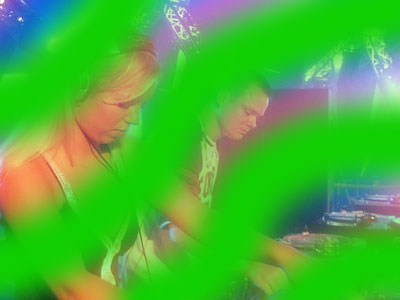
Create a superb multi-colored photo effect using a stock DJ photo. Below is a before and after picture of what we're going to accomplish with this Photoshop tutorial, note that this is not the original width of the picture.
Create a superb multi-colored photo effect using a stock DJ photo. Below is a before and after picture of what we're going to accomplish with this Photoshop tutorial, note that this is not the original width of the picture.
Step 1:
First open up an image of your choosing, or you could download mine below.
Now duplicate the only layer you have so far, do this by right-clicking on it and choosing "Duplicate layer", name this layer Gaussian blur.
When your done with that we have to give it a Gaussian blur, go to Filter > Blur > Gaussian blur, and give it a blur of 5.6 pixels, press OK.
The last thing we have to do for this layer is modify the layer blend mode and the opacity in the layers palette, so make sure you still have the Gaussian blur layer select then set the blendmode to Screen, and the opacity to 55%.

Step 2:
Moving on.. Take out the brush tool , and select a soft brush with a brush size of 90px. Then make a new layer (Shortcut: Ctrl+Shift+N), name this layer Brush red.
Moving on.. Take out the brush tool
, and select a soft brush with a brush size of 90px. Then make a new layer (Shortcut: Ctrl+Shift+N), name this layer Brush red. Set the foreground color to #cc0102, then make some squiggly lines with this brush like so.

Set the layer blend mode to Screen, leave the opacity as it is on 100%.

Step 3:
Now basically we have to repeat the first part of step 2 so I won't explain it in detail anymore.
Now basically we have to repeat the first part of step 2 so I won't explain it in detail anymore.
Make some squiggly brushes with the same brush size but now with this hex color #10ce01, make sure it's on a new layer!
You can go in different directions with your lines if you want, but I wanted it to keep flowing for the first 2 squiggly line layers.
The blend mode and opacity is different for this layer. Set the blend mode to Soft light and the opacity to 26%.

Step 4:
Now this next layer is we're going to popout some colors with overlaying the colors we have now with blue, let the magic begin.
Now this next layer is we're going to popout some colors with overlaying the colors we have now with blue, let the magic begin.
Change your foreground color to #0000cf, make a new layer and brush some blue in the top right corner like so.

Set the blend mode to Difference and check out the funky colors! pretty neat isn't it.
Step 5:
Make a new layer again, then press Ctrl+Alt+Shift+E to fill this layer with all visible layers.
Make a new layer again, then press Ctrl+Alt+Shift+E to fill this layer with all visible layers.
Then go into transform mode (Shortcut: Ctrl+T) and make the layer a bit bigger by dragging the bottom right corner square down and to the right, Hold shift when you do to keep the original ratio of the image.
Change the blend mode to Screen and opacity to 34%.
As you can see this gives you a nice doubled effect.

Step 6:
Make a new layer again and fill this layer with all visible layers, you now know how to
Then go to Filter > Sharpen > Sharpen, then press Ctrl+F 1 time to apply another Sharpen.
Note: Ctrl+F applies the last filter used.

Step 7:
Now let's tweak the colors even more by using a few adjustment layers shall we. Make a new layer adjustment, do so by clicking this icon
Now let's tweak the colors even more by using a few adjustment layers shall we. Make a new layer adjustment, do so by clicking this icon

in the layers palette, then choose color balance as the adjustment layer and use the following settings:
From left to right:
Shadows: -62, -42, +40
Midtones: -43, +53, +100
Highlights: -38, +12, -28
From left to right:
Shadows: -62, -42, +40
Midtones: -43, +53, +100
Highlights: -38, +12, -28

Step 8:
Now add another adjustment layer but now choose the Photo filter effect, and use a photo filter of your choosing, I've used the Green photo filter on 25% density.
Now add another adjustment layer but now choose the Photo filter effect, and use a photo filter of your choosing, I've used the Green photo filter on 25% density.
And that leaves us with the final result, hope you enjoyed this photoshop tutorial.

No comments:
Post a Comment