

STEP 1
Our poster sets the theme of our fictional movie, the overall grungy appearance and creepy skull give the design a dark atmosphere while the cowboy hat, twin revolvers and vintage playing cards all fit into that wild west theme. The whole design is basically a composition of stock photos, with some basic image manipulation techniques and colour correction finishing off the poster.

STEP 2
Open up a dirty old paper texture in Photoshop as a base for our movie poster. Press CMD+Shift+U to desaturate the colours then CMD+I to invert the image leaving a dark texture. Mark out guides to identify the center line and a ‘safe-zone’ margin around the edge.

STEP 3.
Find a stock photo of a human skull and open it up in Photoshop. This particular image is isolated on a black background, making it easy to clip out with the Magic Wand tool.

STEP 4.
Desaturate the skull image and adjust the levels to bump up the contrast.

STEP 5.
Switch over to the Channels tab and hold the CMD key while clicking the thumbnail of any channel to load its selection. Press CMD+C to copy.

Paste the selection into the main document. The channel selection creates a cool effect where only the highlights are copied, so the skull appears to merge into the darkness.

STEP 7
Browse the stock photos sites for a Cowboy Hat at the correct angle and clip out the image using the Pen tool.

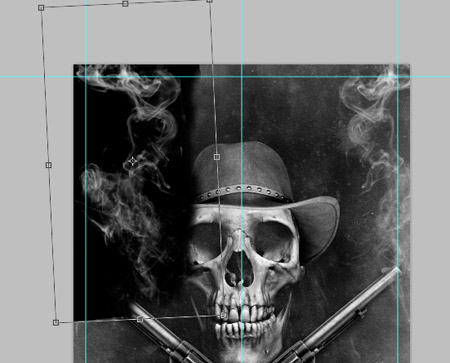
STEP 8
Paste the hat clipping into the main document and scale it into place over the skull. Adjust the opacity so you can see the skull outline, then delete away the excess to provide a seamless fit.

STEP 9
Desaturate and adjust the levels of the hat image so it blends with the tones of the skull.

STEP 10
Next up in our collection of images is a photo of a Colt Single Action Army This image can be found via Wikimedia Commons under a Creative Commons license. Clip out the gun with the pen tool and paste it into the main document.

STEP 11
Desaturate and adjust the contrast of the revolver, then make a duplicate and flip it onto the other side. Align both items to the centre of the design.

STEP 12
Add a heavy drop shadow to the revolvers so they stand out against the background.
STEP 13
Find an image of rising smoke against a black background. Desaturate the image then change the blending mode to Screen to render the black areas transparent.

STEP 14
Search the stock photo websites for a hand of vintage playing cards. Rotate them so they fan out like wings from the skull.

STEP 15
Manually draw an outline around the skull and delete this selection from the playing cards. Because the skull was pasted as a channel we can’t simply load the layer’s selection.

STEP 16
Change the layer style of the playing cards to Vivid Light at 30% opacity. Vivid Light in particular really intensifies the grain from the background texture and makes the cards much more subtle.

STEP 17
Now the main imagery is in place let’s add our typographic elements. Type in the title of your western movie in a suitable font. Here I’m using Clarendon Condensed.

STEP 18
Aim to use a traditional slab-erif font that you have condensed and normal/wide variants for, so you can mix and match the styles like old wanted posters.

Use the crossbar of the H as a guide to create a line of the appropriate height. Fill these lines above and below the title.

STEP 20
Load the selection of the hat layer and delete out the overlap over the title.

STEP 21
Use a subtle grunge Photoshop brush to distress the text to fit in with the overall grungy atmosphere of the design.

STEP 22
Add a large Drop Shadow to all the title elements, but make sure the Choke is set to full to create a solid shadow effect.

STEP 23
Add a tagline to the bottom of the poster to finish off the overall composition.

STEP 24
The design looks pretty cool in black and white, but to fit in with the era of the Wild West a sepia tone would be a better fit. Open up the original paper texture and paste it on a new layer using the Color blending mode set to 40%.

STEP 25
Select All then Copy Merged and paste this duplicate of the design on a new layer. Give the layer a High Pass filter (Filter > Other > High Pass) and adjust the settings until the details are barely visible through the grey background. Change this layer to Linear Light at 70% to really bring out the detail of the image.

STEP 26
This leaves out grungy western movie poster design complete. The simple composition of stock photos really creates a cool image, while the distressed textures help tie together the tones to create a consistent theme.
No comments:
Post a Comment