Drawing tribal flames can be complicated sometimes and so can dragon art. Tribal tattoos are probably one of the most popular art to get inked on the human body. There are so many things that can be drawn out and needled onto the skin.
Not only is there tribal flames, you can get tribal art lines, tribal eyes, and other tribal animals like lions, tigers and panthers. The art of tribal lines is a technique that has come a long way.
Did you know that tribal tattoo designs originated from the Polynesian Islands?
It’s true, tribal tattoo art came from different islands ranging from Hawaii to Tahiti and with every island comes a different tribal style for the lining. Today one of the popular tribal design art consist of all black ink with an Asian twist. Dragons have become an ever growing phenomenon for tattooing.
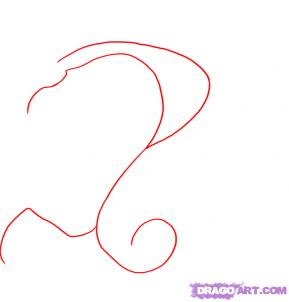
Step 1.
You can start this step with a simple line of the dragon's line of postion. This is a very simple step and should be drawn out with ease. It sort of looks like the outline of a cobra doesn't it?

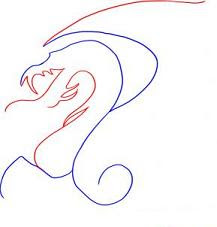
Step 2.
You will start this step by drawing out the pointed lining shape for the wing. Then move on to drawing out the design of the open dragon mouth with a tongue line sticking out. You will then draw the chest line as well.

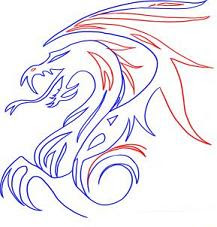
Step 3.
For this third step you will be drawing the curvy but pointy looking lines until you have a tribal design you are happy with. Add an eye and then the rest of the tongue and teeth. By the time you are done with this step you should already see the shape of a sharp claw and the bottom of the wing design

Step 4.
You are almost done with this lesson and so far I just know you are doing a great job. Sketch out the tribal lining for the wing and make sure that the tips are nice and pointed. Add frill shapes on the back of the head and then move to the last drawing step.

Step 5.
Draw out the remaining lines to complete your tribal art for your last drawing step. There are no guidelines or shapes to erase because you started this lesson with the lines that would be incorporated with the design of your tribal dragon art.

Step 6
Once your design is colored in you should have something that looks like the one you see here. Remember you don't have to use a black color.Choose from blue, red, green and purple.
I hope you had fun learning how to draw tribal dragon art step by step.

Link : HERE

Awesome tutorial! Thanks!
ReplyDelete